
Knowledge sources are the information your AI agent uses to create AI-generated answers to questions from your users. These types of AI-generated answers are known as generative replies.
Adding knowledge sources to your AI agent lets it generate answers to help customers without requiring you to script every response.
This article contains the following topics:
Related articles:
About knowledge sources
You can import the following different types of knowledge source into an advanced AI agent:
- Help centers: Web-based help centers powered by Zendesk, Salesforce, or Freshdesk.
-
CSV files: CSV files formatted with article information.
This is a good solution for importing knowledge bases that aren't natively supported or that are protected by single sign-on (SSO).
-
Content imported with a web crawler: Information from a webpage or set of webpages.
This option is best suited for importing information from a knowledge base, FAQ, or product description page. It is less suited to e-commerce web shops. For e-commerce pages, we recommend building an integration capable of retrieving relevant product information and adding that information in a dialogue or generative procedure.
You can add multiple knowledge sources to a single AI agent. For example, you can import articles from multiple Zendesk help centers, multiple CSV files, or a combination of both. Nevertheless, we recommend keeping the overall number of knowledge sources within a reasonable limit. Having lots of sources can in some cases lead to reduced accuracy and increased latency.
It’s important to understand that your AI agent doesn't search live data in a help center, file, or website. Instead, the information is imported into the AI agent on a one-time or recurring basis. The AI agent uses this imported information when generating its replies.
Importing a knowledge source
Client admins can import knowledge sources for an AI agent.
To import a knowledge source
- In the top-right corner, use the AI agent drop-down field to select the AI agent you want to import a knowledge source for.
- In the left sidebar, click either of the following:
- Settings > Generative replies > Knowledge sources for a zero-training AI agent.
-
Content > Knowledge > Knowledge sources for an agentic AI agent.
The Knowledge sources page opens.
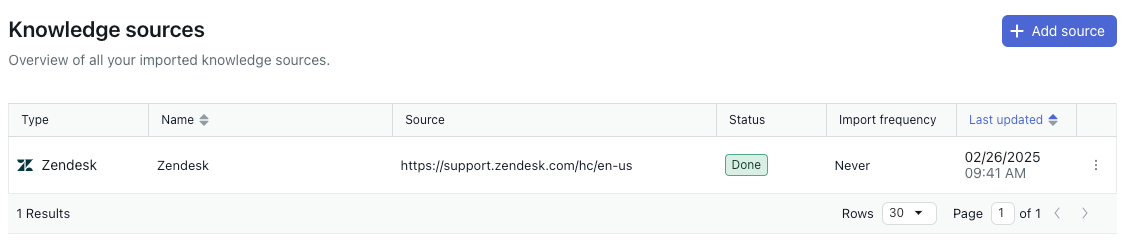
- Click Add source.
The Add source pane opens.
- In the Type dropdown, select one of the following options:
- Zendesk: Imports a Zendesk help center.
- Salesforce: Imports a Salesforce help center.
- Freshdesk: Imports a Freshdesk help center.
- File (CSV): Imports a file in the .csv format.
- Web crawler: Imports content from a specified website.
- Follow the instructions below for the source you chose:
Importing a Zendesk help center
- In the Add source pane, select a Type of Zendesk.
- In Help center URL, enter the full URL of your Zendesk help center.
- You can add your whole help center, or only a certain section of your help center.
- You can include the locale in the URL path to specify which language’s articles to import (for example, yoursubdomain.zendesk.com/hc/en-us).
- In Source name, enter a name for your source.
This name is used in reporting within AI agents - Advanced.
- In Import frequency, select how often the help center content should be reimported: Daily, Weekly, Monthly, or Never.
Regular reimporting keeps the AI agent up to date. If you want to import the content only once, select Never. Daily imports aren’t recommended unless your knowledge source is updated very frequently. For most organizations, a weekly or monthly cadence is fine. Remember that you can always manually reimport if new changes need to be reflected outside the scheduled reimport.
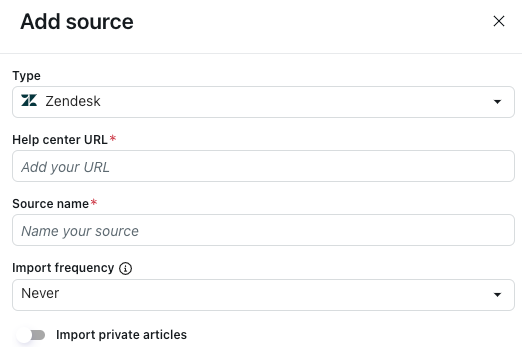
- If you want to import restricted articles:
- Toggle on Import private articles.
- In Email, enter the email address of a user authorized to access the restricted content.
This is typically your admin email address.
- In API access token, enter an API token that you generate for this purpose.
- Click Import.
Importing a Salesforce help center
- In the Add source pane, select a Type of Salesforce.
- Click Sign in to Salesforce.
- Log in to your Salesforce environment.
- In Help center URL, enter the full URL of your Salesforce help center.
- In Source name, enter a name for your source.
This name is used in reporting within AI agents - Advanced.
- In Import frequency, select how often the help center content should be reimported: Daily, Weekly, Monthly, or Never.
Regular reimporting keeps the AI agent up to date. If you want to import the content only once, select Never. Daily imports aren’t recommended unless your knowledge source is updated very frequently. For most organizations, a weekly or monthly cadence is fine. Remember that you can always manually reimport if new changes need to be reflected outside the scheduled reimport.
- Click Import.
Importing a Freshdesk help center
- In the Add source pane, select a Type of Freshdesk.
- In Help center URL, enter the full URL of your Freshdesk help center.
You can add your whole help center, or only a certain section of your help center.
- In Source name, enter a name for your source.
This name is used in reporting within AI agents - Advanced.
- In Import frequency, select how often the help center content should be reimported: Daily, Weekly, Monthly, or Never.
Regular reimporting keeps the AI agent up to date. If you want to import the content only once, select Never. Daily imports aren’t recommended unless your knowledge source is updated very frequently. For most organizations, a weekly or monthly cadence is fine. Remember that you can always manually reimport if new changes need to be reflected outside the scheduled reimport.
- In API access token, enter an API token that you generate in Freshdesk for this purpose.
- Click Import.
Importing a CSV file
- In the Add source pane, select a Type of File (CSV).
- Click Select knowledge source CSV file.
- Select the CSV file you want to import.
See Required formatting for the CSV file to ensure your file is properly formatted.
- In Source name, enter a name for your source.
This name is used in reporting within AI agents - Advanced.
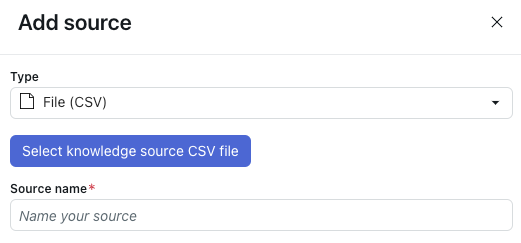
- Click Import.
Required formatting for the CSV file
The CSV file you upload as a knowledge source must have one row for each article you want to import. The file must include the following columns:
- title: The title of the article.
-
content: The full content of the article.
- The content can contain HTML tags, so there's no need to strip those out. In fact, tags can help as they give structure to the articles, and that structure helps the AI agent understand the article sections.
- The content can also contain Markdown, but the Markdown must be valid or else the content of that cell will not be imported. Additionally, if the Markdown has been written in such a way that the cell is a single line of more than 2,000 characters, importing the cell fails without showing any warnings.
You can also include the following optional columns:
- labels: A list of label names separated by a space. The values can be anything you want to categorize content by.
- locale: Used to organize articles by language or market. While the values can technically be anything, it's recommended to follow standard locale notation (for example, en-US or fi-FI).
- article_url: The external web address where the article can be found. This is used in source attribution in the widget and reporting within AI agents - Advanced.
The file format must use commas (,) as a column separator and double quotes (") as the string quote character. The first row is always for column headers.
Importing content with a web crawler
- In the Add source pane, select a Type of Web crawler.
- In Source name, enter a name for your source.
This name is used in reporting within AI agents - Advanced.
- Select Crawl exact URL if you want the web crawler to import information only from webpages listed in the Start URLs field, not including any sub-pages.
When this option is not selected, the web crawler applies a maximum crawling depth of 15 sub-pages for any URLs listed in Start URLs.
- In Start URLs, enter the URLs you want the web crawler to go through.
List each URL on a separate line.
- In Import frequency, select how often the crawled content should be reimported: Daily, Weekly, Monthly, or Never.
Regular reimporting keeps the AI agent up to date. If you want to import the content only once, select Never. Daily imports aren’t recommended unless your knowledge source is updated very frequently. For most organizations, a weekly or monthly cadence is fine. Remember that you can always manually reimport if new changes need to be reflected outside the scheduled reimport.
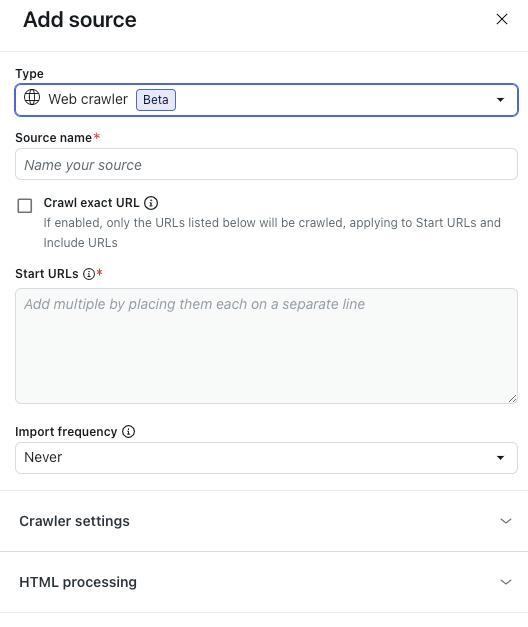
- (Optional) Expand Crawler settings to configure advanced crawler settings.
See Configuring advanced crawler settings for details.
Note: These settings are recommended only for organizations with complex technical requirements. Many organizations do not need these settings. - (Optional) Expand HTML processing to configure advanced HTML settings.
See Configuring advanced HTML settings for details.
Note: These settings are recommended only for organizations with complex technical requirements. Many organizations do not need these settings. - Click Import.
Configuring advanced crawler settings
-
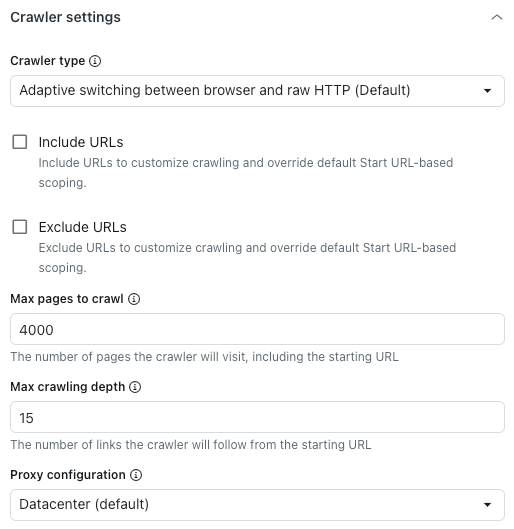
Under the Crawler settings heading, in Crawler type, select one of the following options:
- Adaptive switching between browser and raw HTTP (Default): Fast and renders JavaScript content if present.
- Headless browser (Firefox + Playwright): Reliable, renders JavaScript content, best in avoiding blocking, but might be slow.
- Raw HTTP client (Cheerio): Fastest, but doesn’t render JavaScript content.
- Raw with JavaScript: Crawl the page as is using JavaScript.
- Select Include URLs or Exclude URLs to customize the crawling scope set in the Start URLs field above.
In the field below each setting, enter the URLs you want to include or exclude. Enter each URL on its own line.
These settings affect only the links found while crawling sub-pages. If you want to crawl a page, make sure to specify its URL in the Start URLs field.For example, if the URL structure is inconsistent as in the example below:
- Start URL:
https://support.example.com/en/support/home - Article URL:
https://support.example.com/en/support/solutions/articles/…
https://support.example.com/en/support/**
This way, the web crawler will include all of the articles, even though their path is different from the starting URL.
As another example, the following page is very broad and includes irrelevant pages (for example, the careers page):- Start URL:
https://www.example.com/en
https://www.example.com/en/careers/**
Tip: More powerful than plain text, globs are patterns that let you use special characters to create dynamic URLs for the web crawler to search. Here are a few examples:-
https://support.example.com/**lets the crawler access all URLs starting with https://support.example.com/. -
https://{store,docs}.example.com/**lets the crawler access all URLs starting with https://store.example.com/ or https://docs.example.com/. -
https://example.com/**/*\?*foo=*allows the crawler to access all URLs that contain foo query parameters with any value.
- Start URL:
- In Max pages to crawl, enter the maximum number of pages the web crawler will go through, including the starting URL.
This includes the starting URL, pagination pages, pages with no content, and more. The web crawler will automatically stop after reaching this limit.
- In Max crawling depth, enter the maximum number of links the web crawler will follow from the starting URL.
The starting URL has a depth of 0. Pages linked directly from the starting URL have a depth of 1, and so on. Use this setting to prevent accidental web crawler runaway.
- In Proxy configuration, select one of the following options:
- Datacenter (Default): Fastest method to scrape data.
-
Residential: Reduced performance, but less likely to be blocked. Ideal for when the default proxy is blocked or when you need to crawl from a specific country.
Configuring advanced HTML settings
-
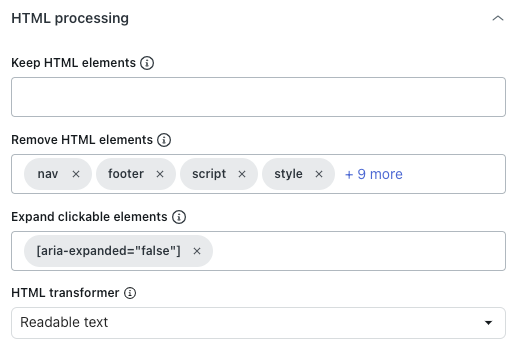
Under the HTML processing heading, in Keep HTML elements, enter a CSS selector to keep only specified HTML elements.
All other content will be removed, helping you focus only on relevant information.
- In Remove HTML elements, choose which HTML elements to remove before converting to text, Markdown, or saving as HTML.
This helps exclude unwanted content.
- In Expand clickable elements, enter a valid CSS selector matching DOM elements that will be clicked.
This is useful for expanding collapsed sections in order to capture their text content.
- In HTML transformer, select one of the following values to define how to clean up the HTML to keep only important content and remove extraneous content (for example, navigation or pop-ups):
- Extractus: (Not recommended) Uses the Extractus library.
- None: Removes only the HTML elements specified in the Remove HTML elements option above.
- Readable text: Uses Mozilla's Readability library to extract the main article content, removing navigation, headers, footers, and other non-essential elements. Works best for article-rich websites and blogs.
-
Readable text if possible: Uses Mozilla's Readability library to extract the main content, but falls back to the original HTML if the page doesn't appear to be an article. This is useful for websites with mixed content types, such as articles or product pages, as it preserves more content on non-article pages.
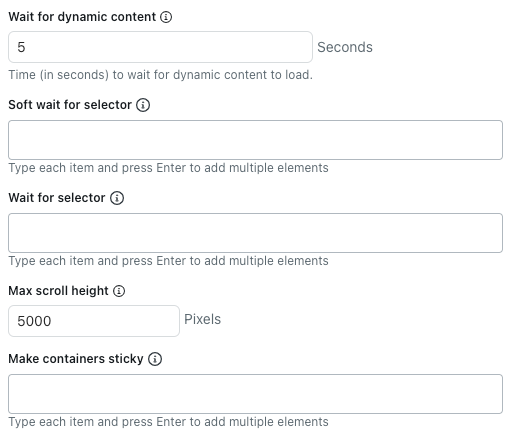
- In Wait for dynamic content, enter the number of seconds the crawler should wait for dynamic content to load. By default, it waits five seconds or until the page finishes loading, whichever comes first.
- In Soft wait for selector, enter CSS selectors for HTML elements that the crawler should wait to load before extracting content.
If the selected element isn't present, the crawler still crawls that page.
List each CSS selector on a separate line.
- In Wait for selector, enter CSS selectors for HTML elements that the crawler must wait to load before extracting content.
If the selected element isn't present, the crawler doesn't crawl that page.
List each CSS selector on a separate line.
- In Max scroll height, enter the maximum number of pixels the crawler should scroll.
The crawler scrolls the page to load more content until the network is idle or this scroll height is reached. Set this to 0 to disable scrolling completely.
This setting doesn't apply when using the raw HTTP client, as it doesn't run JavaScript or load dynamic content.
- In Make containers sticky, enter CSS selectors for HTML elements where child content should be kept, even if it's hidden.
List each CSS selector on a separate line.
This is helpful when using the Expand clickable elements option on pages that remove hidden content from the page entirely.
0 comments
Please sign in to leave a comment.