
This article describes functionality available only to customers who had a drafted or published AI agent as of February 2, 2025.
In this workflow, you'll learn how to create an answer in your AI agent for messaging to notify your customers of your business hours when no agents are online. An admin can perform this setup.
The video below walks you through the setup, or you can follow the written steps below. You can change the steps within the answer if they don't fit your ideal workflow.
This article contains the following topics:
Related articles:
- Creating answers for common customer questions in AI agents for messaging (Legacy)
- Setting your schedule with business hours and holidays
Step 1: Creating the answer
In the bot builder, you can create an answer that your AI agent uses to respond to an end user's request.
To create the answer
- In Admin Center, click
 AI in the sidebar, then select AI agents > AI agents.
 - Click Manage AI agents for messaging.
- Click the name of the AI agent you want to edit.
- Select the Answers tab, then click Create answer.
- Click Build your own answer, then click Next.
- Enter the Answer name, then click Next.
- Do one of the following:
- If you have intents assigned to your account, select one or more of the suggested intents.
- If you don't have intents assigned to your account, enter Training phrases in the available fields. If you need to add more than three phrases, click Add phrase.
- Click Next.
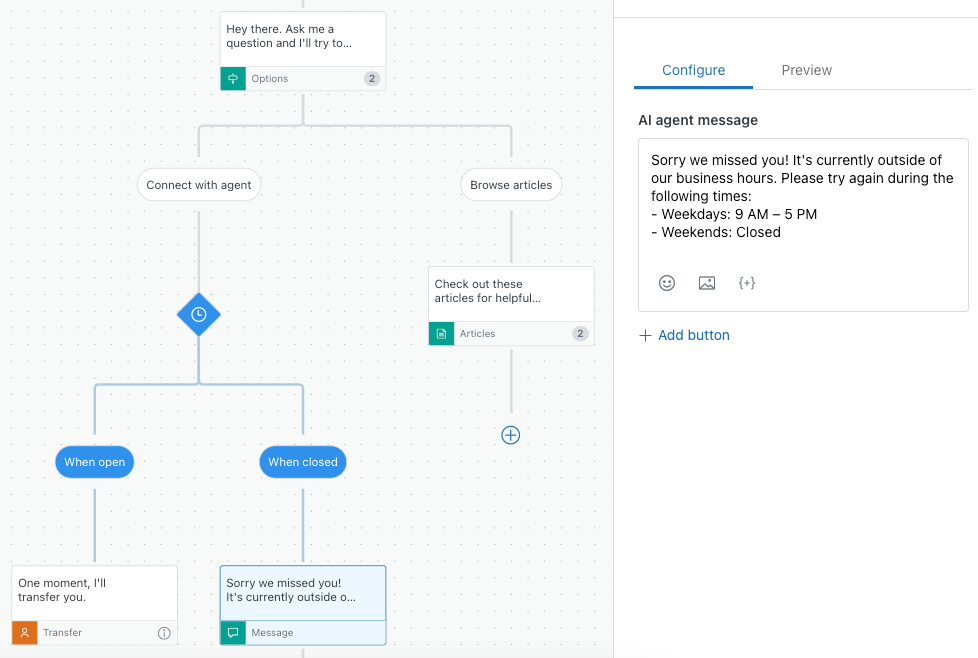
The answer opens in bot builder, where you will build out the bot’s response. - Click Add step.
- Under Choose step in the configuration panel, select Present options > Manual.
- In the AI agent message field, enter the initial message you want the AI agent to send to the end user.
In this example, the message is: "Hey there. Ask me a question and I'll try to help. Or, select an option below." - Under Options, add the options the AI agent should present to the end user.
In this example, the two options are Connect with agent and Browse articles. - Under Connect with agent in the answer flow, click Add step and select Add business hours condition.
If you've configured business hours in your account, the available schedules appear in the drop-down. If you have more than one schedule, select the one you want. - Under When open in the answer flow, click Add step and select Transfer to agent.
- In the AI agent message field in the configuration panel, enter the message the AI agent should send to an end user when transferring them to a human.
In this example, the message is: "One moment, I'll transfer you." - Under When closed in the answer flow, click Add step and select Send message.
In this example, the message is: "Sorry we missed you! It's currently outside of our business hours. Please try again during the following times: - Weekdays: 9 AM – 5 PM - Weekends: Closed" - Under Browse articles in the answer flow, click Add step and select Show Help Center articles.
- In the AI agent message field in the configuration panel, enter the message the AI agent should send to an end user when they decide to browse help center content.
In this example, the message is: "Check out these articles for helpful information." - Under Articles in the configuration panel, select up to six help center articles to present to the end user.
- Click Done.
Step 2: Adding the answer as a standard response
After you create your answer, you need to specify when the AI agent should use it during conversations with end users.
To add the answer as a standard response
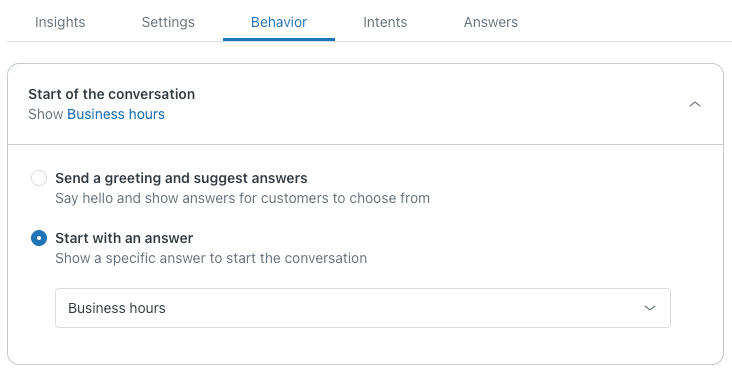
- In your AI agent, select the Behavior tab.
- Expand the Start of the conversation section.
- Select Start with an answer.
- In the drop-down field, select the answer you created above to show business hours.
- Click Publish AI agent.
0 comments
Please sign in to leave a comment.